Showing posts with label Snacks. Show all posts

Monday, November 21, 2016

Baked BBQ Chicken Nachos:


Happy Thanksgiving week, y'all!!!!!!

I'm so excited for this week! 
Yes, because this is mine and Bradley's second thanksgiving together, 
and first thanksgiving being married!!!!!!!!!!!!!!!!!!
And we have soooooo much to be thankful for!!!! 
But, also I'm excited because.............................

I GET TO SEE MY FAMILY THIS WEEK!!!!!!!!!!!!!

It's been about 9 & 1/2 weeks since I have seen them (apart from FaceTime), and I CAN'T wait!!!!
Bradley's family is awesome, and they have been so sweet to me and have welcomed me in!
They have definitely helped me make the transition from Maryland to South Carolina a lot easier, but I am still excited to see my family again!

Anyways!!!!
This is not your traditional "thanksgiving" menu item, I know. But sometimes it's nice to break away from all the leftovers the day after Thanksgiving or sometime, and throw together something super fun, super easy, and super yummy for your guests. Or even just yourself!!
Honestly, we totally ate this for dinner, the first time!
But it would be awesome anytime!

I love nachos!! Plain ole' chips and cheese or fully loaded....I'm all in!!
After Bradley and I closed on our house in July, we went out to eat dinner with his family to celebrate. It was this super cool BBQ place, and of all the amazing things on their menu, the BBQ nachos totally jumped out at me!
And they were sooooooo good! Oh my goodness, I was in heaven!

So, I've been thinking about them ever since, and knew I had to make them!!
I looked at a lot of recipes, and they were pretty much all missing the one key ingredient.
Not the chicken.
Not the chips.
But the white queso. 
I'm telling you, it's what TOTALLY makes BBQ Chicken Nachos!!! 
After combining like 4 different recipes, I think I finally got it!! They were really, really good!

So whether its for a super quick dinner, or an awesome appetizer/snack, I hope you try them out!!!


Note: All amounts are just approximate. Feel free to add/take away anything/as much as you want!

3/4 of a (13 oz) bag of tortilla chips, any shape you want
2 cups shredded BBQ chicken
1 large onion
5 ounces white Velveeta Queso cheese
2 teaspoons pickled jalapeno peppers, diced
2 tablespoons juice out of the pepper jar
2 cups of shredded cheese, any kind
Additional diced jalapenos and sour cream for garnish, if desired

Cut onion in half, and slice thin. Saute in a skillet with about 1 teaspoon of butter, over medium-high heat, until tender, and beginning to caramelized; set aside.

Cut white queso cheese into small chunks. Add the diced jalapenos and the juice. 
Place in a small microwave safe dish,
Heat for 30 seconds, stir. Continue heating & stirring in 30 second intervals, until cheese is melted. Set aside.

I used a huge cast iron skillet, but you could use a large plate or serving tray, or a 9x13 baking dish, or cookie sheet, or seriously whatever you want! Just so it's oven safe!
Arrange half of the chips on the bottom of your serving dish.
Add a thin layer of shredded cheese over the chips.
Top with the remaining chips.
Drizzle the melted white cheese all over the chips.
Top with the chicken, and then caramelized onions.
Sprinkle with additional diced jalapenos and remaining shredded cheese.
Bake at 375 degrees F for about 15 minutes or until everything is nice and hot and cheese is melted.
Enjoy!!!!!!!


Monday, September 7, 2015

Products I love: 3 different Granola Bars:

Today, I'm sorry to say that I do not have a recipe to share with you.
However, I'm very excited to share several product recommendations with you!
I am not receiving anything or getting paid to write this post. 
These are not my pictures, but all the opinions are my own. 

I love granola bars. 
For breakfast, a snack, I could eat them any time of day. Surprisingly, there are precious few gluten-free options when it comes to granola bars. And even fewer options if you are not interested in eating the same kind of granola bar for the rest of your life.
We have been getting the Nature Valley Trail Mix bars for years, and whereas they are good, I personally am getting sick and tired of them, and would be perfectly content not to see another one for the rest of my life!!
Yes, I do make my own and all that sometimes. But I have been traveling a lot recently, and have encountered different situations where I needed those bars to be completely sealed 
(example: in the airport, camping/vacationing where it's very damp and humid, etc.)
Being in one of those situations recently, I randomly started reading every.single.lable of every.single.box of granola bars in the grocery store. I have done this time, after time, only to find 2, maybe 3 bars that were gluten-free.  
However, this time I was SO excited to come across three very different bars, that were all gluten-free!! So of course I got all of them to try, and I ended up loving each and every one of them!
They were each very different and unique, yet delicious!
Both of the Nature Valley Bars are completely gluten-free. 
The milk&cereal bar, however, does have malt extract, which is derived from barley. This does not bother me, but for someone with extreme gluten sensitivity, or actual Celiac Disease, this may be a problem, so you have to use your own judgement.

I hope you will check your grocery and give some of these a try!!!
If you are a fellow granola bar lover, I don't think you'll be disappointed!

~Peanut Butter Dark Chocolate~


~Mixed Berry with Greek Yogurt~


~Honey Nut Cheerios Milk&Cereal Bars~


post signature

Monday, April 13, 2015

Sugared Pecans:

My sister got this recipe from one of her co-workers and it is seriously amazing!! I love warm and/or glazed nuts and these are fabulous!! Plus, they're so easy! I've tried other recipes similar to this before, but they just never really made the cut. These, however, went above and beyond! We ate them plain mostly, but they were also SUPER yummy on hot fudge sundaes!! I think they would also be great on a salad as well!!  If you have ever had a sundae at Denny's, these nuts taste remarkably close to the ones that come on those sundaes!
Anyway you eat them, they're just simply going to be good, so I hope you try them out!!!!


1 stick butter
1 cup sugar
1 tsp. cinnamon
3 egg whites
4 cups pecans

Preheat oven to 350 degrees. 
Place the butter in a large baking sheet (with sides, of course!). Place the pan in the oven until the butter melts.
In a medium bowl, whisk together the sugar, cinnamon and egg whites. Add pecans and stir until evenly coated. Pour into buttered pan. Bake for 24 minutes, stirring every 8 minutes.
Pour onto wax paper and allow to cool completely. Store in an airtight container.
Enjoy!

post signature

Monday, December 15, 2014

Flourless Chocolate Peanut Butter Muffins:

I love muffins as it is, but when they are super quick and easy muffins? Well, that just makes me love them even more!! From start to finish, these can be done in under 20 minutes! And you'll never guess they don't have flour in them! I was skeptical at first, but wow! They are SO good! They have the texture of any normal muffin, except they are just really moist and absolutely delicious! 


1 medium banana
1 egg
1/2 cup creamy peanut butter (a generous 1/2 cup)
1/3 cup baking cocoa
3 tblsp. honey
1 tblsp. vanilla
1/4 tsp. baking soda
pinch of salt, optional
1/2 cup chocolate chips, regular or mini

Prepare a mini muffin tin with paper baking cups or generously coat with cooking spray; set aside.
Place all ingredients, except the chocolate chips, in a blender. 
Blend until smooth. Stir in chocolate chips. Using a small cookie scoop, fill mini muffin cups 3/4 full. Sprinkle additional chocolate chips over the tops of the muffins, if desired. Gently press into the batter.
Bake at 400 degrees for 8-12 minutes, or until toothpick inserted in the center comes out clean, or with a few moist crumbs.
Cool in muffin pan for 10 minutes. Remove to a clean dish towel or cooling rack to cool completely.
Store in an airtight container at room temperature for up to 5 days or up to 4 months in the freezer.

Note:
-I actually prefer NOT to use paper baking cups. They work okay, but these muffins have a tendency to stick to the paper. They come right out of the greased muffin tin, so that's the method I prefer. 

post signature

Monday, August 18, 2014

Italian Veggie Dip:

I love sweet snacks and a good dessert, but I also LOVE fresh veggies and dip!!!!! Especially a homemade dip. We had a bunch of fresh veggies recently, and my sister and I were so excited to make a big batch of homemade ranch dip to go with all the veggies we were planning on devouring! Unfortunately, we found out we were out of Ranch Dressing Mix. We grabbed the next best thing, and just hoped it would work!
And it did! Really well, actually! The Italian Seasoning was not overpower at all, but went so well with the vegetables! Just talking about it, makes me want a big bowl of veggies and dip right now!!
This is also perfect if you have lots of produce coming from your garden!
I hope you'll try it out!


1 (16 oz.) container Sour Cream
2 packets Zesty Italian dressing mix
Raw vegetables of your choice

Place sour cream in medium size bowl. Add dressing mix and mix until thoroughly combined.
Serve immediately, or chill until ready to serve!

Note:
-This was also very good as a chip dip!
-Click HERE to view on MyRecipe Magic, where you can find the nutritional information for this recipe!


post signature

Monday, May 26, 2014

Pancake Poppers:

I love pancakes! When I was younger, we had pancakes just about every Saturday morning, and well, we still do that I guess! Not every week, but probably at least twice a month!
During the week, things are too busy to make pancakes in the mornings, but some of us aren't huge cold cereal fans. I came across this idea, and decided to try it out. It worked great and makes for a quick and yummy breakfast! I babysit some kids that really like pancakes, and they love these!!
I let the little kids eat them warm as they are, and tear them up in pieces for the toddlers. It works great! I hope you'll give them a try too!!


4 eggs
4 cups milk
2/3 cup canola oil
1 tsp. vanilla
4 cups flour
1 tsp. xanthan gum
8 tsp. baking powder
1/2 cup sugar
1/2 tsp. salt
Optional: Blueberries, strawberries, crumbled cooked sausage, crumbled cooked bacon pieces, chopped nuts, chocolate chips, whatever you can think of!
In a large mixing bowl, beat the eggs until foamy. Add milk, oil and vanilla. Mix well. Add dry ingredients and mix until well combined.
Spray a mini-muffin tin with cooking spray. Using a cookie scoop, fill muffin cups 3/4 full. If you want to add any optional ingredients, now is the time to add them. Sprinkle over the muffin cups and press gently into the batter. Bake at 435 degrees for 12-18 minutes or until very light golden brown. Let set in the pan for 3-5 minutes. Run a table knife around the edges to loosen from the pan. Flip them out on a wire rack or even just the counter top and let them cool. Place on a baking sheet (preferably so they aren't touching too much) and freeze for 2-3 hours. Remove from the cookie sheet and place in a ziplock bag. Freeze until ready to use!!
To Re-Heat:
For about 6 poppers, microwave for 1 minute to re-heat! Dip in syrup!

Note:
-We prefer to use Rice Milk in our pancakes, but you can use whatever you like.
-You can, of course, use any pancake mix you want!

Monday, April 7, 2014

Cracker Jacks:

My mom used to make this for special occasions and it was the second thing she taught me and my sister how to make! It always reminds me of Thanksgiving at grandma's house! I hate to brag, but I feel like you need to know, it tastes 10 times better than what you buy in that box at the store! I honestly didn't know those even existed until a several years ago. I tried some, and after one bite, I knew why! Now, I'm not talking about Caramel Corn like you get in the tins at Christmas time! I LOVE, LOVE, LOVE all three flavors in those tins!!
But still, this recipe is so good, and really so easy!
I actually thought I already had it on the blog, but I went to make some for a movie night with some friends last week, and I realized I hadn't posted it!
I hope you try it out and enjoy it as much as we do!
 
 
2 cups brown sugar
2 sticks butter
1/2 cup corn syrup
1 tsp. baking soda
1 tsp. vanilla
6 quarts popped, popcorn
 
Place popcorn in a very large bowl and set aside.
In a medium saucepan, bring sugar, butter and corn syrup to a boil; boil and stir (with a whisk is best) for 5 minutes. Remove from the heat and stir in baking soda and vanilla (see note).
Pour the sauce over the popcorn, and gently stir until evenly coated.
Pour into a large, greased pan (see note).
Bake at 200 degrees for 1 hour, stirring every 15 minutes. Flip out onto a counter top or table top and spread out evenly to cool, breaking larger chunks into smaller ones.
Let cool completely and store in an airtight container.
Enjoy!
 
Note:
-Be careful when you stir in the baking soda and vanilla, because it will bubble up! It scares me every time!  
-A foil pan works fabulous for this!
-If we make a bunch of this, which we normally do, we like to store it in one of those popcorn tins!
 
post signature

Monday, February 24, 2014

Dill Pickle Dip:

 My birthday was last week, and like most people, my family kept asking me what I wanted for dessert, and things like that. I really just enjoy all kinds of food - a lot! So it's hard for me to pick one thing!! I seriously thought about it for days! We had a lot going on that weekend, and would already be having lots of desserts, so I thought that Chips/Veggies and dip and Chex mix would be fun! And it was a good choice!! Everything was so yummy, and it was so fun to just relax, have some finger foods, and watch one of my favorite movies - Princess Diaries2! And another good part, was that I could pick more than 1 thing!! I love Dill Pickle chips, but they are hard to find where I live, so when I saw this dip recipe, I wanted to try it! And it was so, so good! I actually like it far better than the dill pickle chips! So, even if it's not your birthday or any special occasion, I hope if you like dill pickles, you'll give this super easy recipe a try!!
 
 
1 (8 oz.) block cream cheese, room temperature
1/2 - 1 cup chopped dill pickles, depending on how much you like pickles!
1 tblsp. Worcestershire sauce
Pickle Juice
 
Using a hand mixer, cream together the cheese, pickles and Worcestershire sauce, until well combined. If it's too stiff for you, than you can pour in a small amount of pickle juice from the jar, until it reaches desired consistency. Serve or chill until ready to serve!
 
Note:
-You can use any size pickle. I used the pickle slices, and chopped them about as small as I could get them.
-It's actually a lot better served the next day! The flavors have a chance to blend I guess, and it's just really super yummy!
-I served it with Potato Chips, but it's actually good with tortilla chips too, and I'm sure you could serve it with crackers as well!
 It's just good, no matter how you serve it!!!
 
post signature

Monday, January 20, 2014

Seasoned Pretzels:

My sister got this recipe from her friend from school, and we absolutely loved it!
I don't know how to describe the taste. When you look at the ingredients, you kind of wonder how those things could taste good together, but somehow they work and taste amazing! Plus, they couldn't be any easier to make! 
I hope you give them a try!

1 cup canola oil
1/2 tsp. lemon pepper
1/2 tsp. dill weed
1/2 tsp. garlic powder
1 pkg. (3 tblsp.) ranch dressing mix
1 & 1/2 - 2 pounds pretzel sticks or twists
In a small bowl, whisk together everything but the pretzels. Place pretzels in a gallon ziplock bag. Pour the seasoning mixture over the pretzels. Seal the bag, and gently shake to coat the pretzels.
Pour onto a wax paper lined cookie sheet and spread evenly. Let stand until dry. Store in an airtight container and enjoy!
post signature

Monday, October 21, 2013

Frozen Grapes:

This may sound crazy to you, and I feel a little funny even sharing it, but they are just SO, SO good! I would take these over almost any treat or snack and I could eat a whole bag of grapes by my self, if they are frozen! Now, I like grapes, anyways, but even some of my family who aren't crazy about them, will eat them like this. 
 
 
They're so refreshing and well, cold, of course!!!!

 
Here's the complicated recipe ingredients and instructions.
I'll try to explain it in detail, so you don't get confused.
 
Ingredients:
Grapes (seedless)
 
Directions:
1. Remove grapes from stems and wash thoroughly.
2. Place on a tray or plate and place in the freezer.
3. When they are completely frozen, remove from tray store in a zip-lock bag or a container.
4. Keep frozen until ready to eat.
 
 
Note:
-You can use any kind of grapes. I recommend only seedless ones, because once they're frozen, there is no way to get the seed out, and you definitely don't want someone choking on a grape seed!
-Kids really like these, but it's sometimes hard for them to eat a whole one, since they are hard, so I usually cut them in half or quarters.
 
I hope you give you them a try!
Leave me a comment to let me know what you think!
 
post signature

Monday, May 6, 2013

Chicken Quesadillas:

We had a few corn tortillas left from the Chicken Enchiladas from last week that I wanted to use up and so I threw this together. And they were so good! This is just a basic recipe. You could make them as is, or add whatever you like! I hope you try them out!


2 corn tortilla wraps
1/4 cup shredded cheddar cheese
2-3 tblsp. shredded, cooked chicken
1 tsp. butter

In a small skillet, melt half the butter over medium heat. Add 1 tortilla. Top with half the cheese and the chicken. Add the remaining cheese and other tortilla. Cook until the tortilla on the bottom is slightly crisp and golden brown. Very carefully, pick the "sandwich" up. Add the other half of the butter and gently flip the "sandwich" over. Cook until slightly crisp and golden brown. Transfer to a cutting board and cut into quarters. Serve immediately.

Note:
-I used canned chicken, but you could certainly use whatever you have.
-I did not season the chicken at all, but I think that taco seasoning or any seasoning you like would be great.
-Use ground beef instead of chicken.
-Try out a different type of cheese.
-Make it a main dish, appetizer or snack.
-We also like these with Mozzarella cheese and Pepperoni, and use pizza sauce as a dipping sauce.
-We liked to dip this in salsa or ranch dressing, but I'm sure lots of other dips would be yummy too!
-Here are some add in's that I think would be really yummy: onions, peppers, tomatoes, spinach...let me know what you liked in yours!!!
post signature

Monday, April 22, 2013

Oatmeal Applesauce Muffins:

I just love muffins! Equally good cold or hot from the oven,
these are perfect for breakfast or a snack!
 I hope you give them a try!


1 cup old-fashioned oats (not instant)
1 cup milk
1/2 cup applesauce
2 egg whites
1 cup flour
1 tsp. xanthan gum
1/2 cup brown sugar
1 tsp. baking powder
1/2 tsp. baking soda
1/2 tsp. salt
1 tsp. cinnamon
1/2 cup raisins, optional
1/2 cup chopped nuts, optional
1 tsp. each of sugar and cinnamon

Soak the oats in the milk for 1 hour. Combine the applesauce and egg whites with the oat mixture and mix until well combined. In a separate bowl, whisk together flour, xanthan gum, brown sugar, baking powder, baking soda, salt and cinnamon. Stir wet ingredients into dry ingredients and mix just until combined. Stir in raisins and nuts, if desired. Line your muffin tin with paper muffin cups and lightly spray with cooking spray. Divide the batter between 12 muffin cups. Mix together sugar and cinnamon and sprinkle over muffins. Bake at 400 degrees for 20-25 minutes or until toothpick inserted in the center comes out clean. Let cool in muffin pan for 5 minutes. Serve or cool completely and store in an airtight container in the refrigerator.

Note:
-Soaking the oats is optional, but results in a softer, more moist muffin.
-I think these would also be great with a variety of dried or fresh fruit.


post signature

Monday, April 8, 2013

Homemade Cheese Crackers:

A nice, soft cracker is something that I really miss sometimes, so I was really excited to find this recipe. They turned out soft inside and crisp on the outside! They didn't have a strong cheese flavor at all either.
Plus, I couldn't believe how quick and easy they were! It took less than 30 minutes from start to finish! 
I hope you give them a try...even if you don't eat gluten-free!


3/4 cup shredded cheddar cheese
1/4 cup butter, cubed and slightly softened
3/4 cup flour
3/4 tsp. xanthan gum (omit if you are not making these gluten-free)
1/2 tsp. crushed red pepper flakes, optional
1 tblsp. milk

Combine the cheese, butter, flour, xanthan gum and red pepper flakes in a food processor. Pulse until the dough turns into course crumbs. Add the milk and pulse until the dough forms into a ball.
Place the dough on a plastic cutting mat and form into a rectangle shape. Cover with plastic wrap and roll out in a rectangle shape to about 1/8-inch thickness. Use a pizza cutter or knife and cut into 1-inch squares. Use a wooden skewer and poke and hole in the center of each cracker. Line a baking sheet with parchment paper and lightly spray with cooking spray. Place the crackers on the cookie sheet allowing at least 1/2-inch between each cracker. Bake at 350 degrees for 12-15 minutes or until bottoms are slightly browned (you don't want to bake them too long). Cool for about 5 minutes before serving. Cool leftovers completely and store in an airtight container.

post signature

Monday, March 25, 2013

Sugar & Spice Chex Mix:

I just love chex mix and this was so fast to put together! I wasn't sure about the Bugles and the cereal together, but they worked just great! Warm from the oven or completely cooled, it was super yummy!
I hope you give it a try!

4 cups Chex cereal
2 cups Cheerios
3 cups original Bugles chips
1 & 1/2 cups almonds
2 egg whites
2 tblsp. water
1 cup sugar
1 tsp. cinnamon

In a large bowl, combine cereal, Bugles and nuts; set aside. In a small bowl, beat egg whites, water, sugar and cinnamon with a whisk or hand mixture until foamy and frothy. Pour over cereal and mix until evenly coated. Pour into a very well greased 15x10-inch baking dish. Bake at 300 degrees for 45-50 minutes, stirring every 15 minutes, until light brown and crisp. Cool completely and store in an airtight container.

Note:
-You can use all Corn Chex, all Rice Chex or a mixture of both.
-Replace the almonds with some other nut or additional cereal.
-Substitute Apple Pie Spice for the Cinnamon.
post signature

Thursday, February 14, 2013

Homemade Gum Drops:

Happy Valentines Day!!!
I hope everyone has a wonderful day!

Homemade Gumdrops

This recipe might be a little late to make for Valentines Day, but you could make them just because, or for a party or something. They are really easy and very yummy! I made them for kids I babysit and also for the kids in my Sunday School class, and they turned out so cute! And they would be great for lots of different things - stars for the 4th of July, Christmas trees...basically the ideas are endless! You can make them whatever color and shape you want!
I hope you give them a try!


2 cups sugar
1 & 1/2 cups applesauce (I used the no sugar added)
2 (3 oz) pkgs. jello, any flavor or color
2 envelopes unflavored gelatin (Knox)
1 tsp. lemon juice
Additional sugar for coating

In a large saucepan, combine 2 cups sugar, applesauce, jello, unflavored gelatin and lemon juice. Whisk together and let stand 1 minute. Bring to a boil over medium-high heat, while stirring constantly. Boil 1 minute (stirring constantly). Immediately, pour into a 9x13-inch baking dish, that has been well coated with cooking spray. Refrigerate until firm (3-4 hours). Loosen the edges of the jello with a spatula and carefully invert onto a cutting board or wax paper that has been sprinkled with sugar to keep the jello from sticking. Using cookie cutters, cut into your desired shape or just cut into squares. Place a sheet of wax paper on a cookie sheet and sprinkle with sugar. Place gum drops on top of sugar and let dry for 6-8 hours. Place more sugar in a small bowl, and roll each gum drop in the sugar to evenly coat. Store in an airtight container!!!

Note:
-The first picture is not mine. I forgot to take a picture of mine before I had them all in bags!
Here is a link to the blog where I found this recipe and where the picture is from!


post signature

Tuesday, January 8, 2013

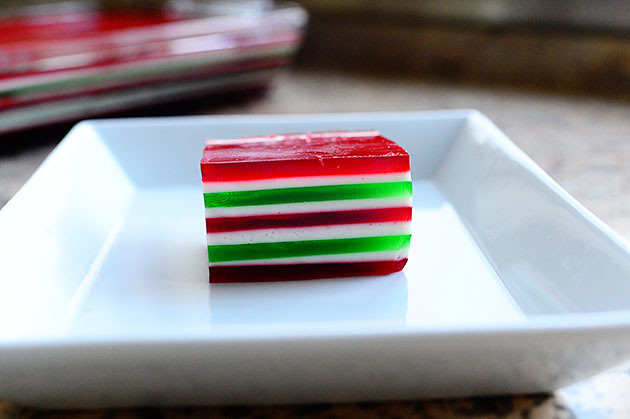
Finger Jello:

DSC_5443

A friend at church made this and I just loved it! I will admit that this does take forever to make, but it's so pretty, it's worth the time! Change up the colors to make it for whatever you want! Red and Green for Christmas and Blue and Red for the fourth of July and make as many layers as you want! The trick is to read down through this whole recipe and get everything out and organized before you start.  It can be slightly confusing, so I will try to write it simple and clear!

3 (3 oz.) pkgs. red Jello, any flavor you want
2 (3 oz.) pkgs. lime Jello
2 (14 oz) cans sweetened condensed milk
9 envelopes Plain Knox Gelatin

Spray a 9x13 baking dish lightly with cooking spray. Fill a tea kettle or large pot with water and bring to a boil; keep boiling until the dish is done.
1. In a large glass measuring cup, mix 1 envelope Knox gelatin with 1/4 cup cold water. Add 1 cup boiling water and 1 box of red jello. Mix slowly until gelatin is completely dissolved. Pour into the 9x13 baking dish. and chill for 30 minutes.
2. In a small glass measuring cup, stir 2 envelopes of Knox gelatin in 1/2 cup cold water and stir until dissolved. Pour 1 can of milk into a medium bowl. Stir in 1 cup boiling water. Pour Knox gelatin mixture into the milk mixture and mix well. Add 1/2 cup boiling water. Pour half of this mixture over the set red jello. Chill for another 30 minutes.
3. Repeat step #1, using green jello, and chill for 30 minutes 
4. Add the other half of the creamy, milk mixture over the green jello and chill for 30 minutes.
5. Repeat step #1, using red jello and chill for 30 minutes.
6. Repeat step #2, pouring half the mixture over the set red jello and chill for 30 minutes.
7. Repeat step #1 using green jello; chill for 30 minutes.
8. Add the other half of the creamy, milk mixture over the green jello and chill for 30 minutes.
9. Repeat step #1 using red jello. Chill the entire thing for at least 2 hours to ensure that everything is completely set. Cut into 2 inch squares and place on a serving plate to serve! Store in an airtight container in the fridge.

At the end you should have:
Red
White
Green
White
Red
White
Green
White
Red

post signature

Saturday, December 8, 2012

Granola Bars (No-Bake):

We really like granola bars, but if you are on a gluten-free diet, they are hard to find and if you do find them, they are hard as rocks or disgusting. We have found one brand at Sam's that we like and can have, but we've been eating them for like 8 years now, so we're kind of sick of them!!! When we went to visit family over Thanksgiving, my cousin made some AMAZING granola bars! We ate them like crazy and she has graciously shared her recipe! I hope you will take 10 minutes and give them a try, because I know you'll love them! Thanks, again, for the recipe, Amber!!!

(Don't go by the picture....they taste FAR better than they look here!
Who knew it was so hard to take pictures of granola bars?)

2 &1/2 cups puffed Rice cereal
1 & 3/4 cups oats, quick or regular
1/4 cup ground flax seeds or additional oats
1/2 cup Add ins - this can be anything from dried fruit, coconut, nuts, sunflower seeds...whatever you like
1/2 cup honey
1/2 cup brown sugar
2/3 cup peanut butter
1 tsp. vanilla
1/2 cup chocolate chips or more add-ins

In a large bowl, combine first 4 ingredients. Combine and set aside.
In a small saucepan, heat honey and brown sugar over medium-high heat until the mixture comes to a boil, stirring constantly. Boil for 30-60 seconds. Remove from the heat and add peanut butter and vanilla. Mix until smooth. Pour mixture over dry ingredients and mix until really well combined. Let stand 5-10 minutes and then stir in the chocolate chips. Press evenly into a greased 9x13-inch baking dish. Let stand until cool. Cut into 24 bars. How easy was that?!!!!

Note:
-My cousin wrapped each granola bar in wax paper and just placed them all in a big bowl. We put the individual bars in snack-size zip-lock baggies.
-When I made these, I didn't have any ground flax seed, so I just added extra oats, but my cousin used flax seeds and it didn't change the taste, just added another "healthy" component!!
-So far we have tried dried cranberries, raisins, and dried blueberries, all of which were delicious!
-You could use Rice Crispies in place of the puffed rice, but I think it's better with the puffed rice and plus it's healthier.
-I've not yet tried it, but they say these freeze really well. If there is ever a time when they last long enough for me to put some in the freezer to try, I will let you know how it works!


post signature

Saturday, December 1, 2012

Knox Blox:

Knox Blox, Jell-O Jigglers, whatever you want to call them....they're good and so fun!
I know they are normally gluten-free, but just incase you don't have the recipe,
I thought I would go ahead and share it!
I hope you enjoy!


4 cups boiling water
4 pkg. unflavored gelatin (Knox)
3 pkg. Strawberry gelatin (or any flavor you want)

Make sure the water has come to a full, rolling boil. Stir the Knox and jello into the water with a whisk, until gelatin is completely dissolved. Pour into a 9x13-inch baking dish. Refrigerate for at least 4 hours, or until set firm. Cut into squares. Serve! Store leftovers in an airtight container in the refrigerator.

Sunday, September 2, 2012

Soft Pretzel Bites:

Yes! You read the title right!!! It's soft, gluten-free pretzels all around!!!
We have tried a few different recipes, and this one is by far the best! And what's really great about it, is they aren't as hard to make as you might think. Yes, they take some time, but if you've been on a gluten-free diet for any amount of time, and enjoyed a soft pretzel or two in your lifetime, "time" is not a huge issue! We'll find it!!!! Even if you aren't a gluten-free eater, though, feel free to give this recipe a try anyways. Just use regular flour and leave out the xanthan gum. It was a wheat-based recipe to begin with, anyways!!!
Now, onto the recipe (and be sure to let me know what you think)!!!!!!


1 cup + 2 tblsp. warm water (see note)
1 & 1/2 tsp. yeast
3 cups flour
2 tsp. xanthan gum
3 tblsp. brown sugar
2 quarts of water
1/2 cup baking soda
Melted butter
Kosher (course) salt

In a small bowl, dissolve yeast in the warm water. Place the yeast mixture, flour, xanthan gum and brown sugar in a large mixing bowl and mix on high for 5 minutes, scraping down the sides of the bowl as needed (if you have dough hooks for your mixer, that would work perfect here). Place dough in a large bowl. Cover with a clean, dry dish towel and let rise for 1 hour.
In a large saucepan, bring the 2 quarts of water and the baking soda to a boil.
Using a 1-inch cookie baller, scoop the dough out into balls. Drop the balls, just a few at a time, into the boiling water and cook for 10 seconds. Place on a greased cookie sheet.
Bake at 425 degrees for 8-10 minutes or until golden brown.
Brush with melted butter, sprinkle with salt and serve immediately!

Note:
-If the water to dissolve the yeast is too hot or too cold, the yeast will die and your dough will not rise. Think about a baby's bath water...that should be perfect.
-These are great plain, or we also like to dip them in: Ranch dressing, mustard, cheese sauce or cream cheese.

Tuesday, June 5, 2012

Jello Fruity roll-ups:

Looking for a cool, yummy, easy, quick and delicious summer treat? This is just the thing for you!
I just love easy, fun snacks and this is definitely that!! It takes all of 5 minutes to throw together, has even less ingredients and they are so yummy! I hope you give them a try! If you try them, let me know what flavor you liked best!!!!


1 box (3 oz.) gelatin, any flavor - strawberry, orange, blue raspberry, lemon, lime.......only jello is the limit!
1/2 cup water
1-1/2 cup mini marshmallows (or 12 large ones)

Lightly spray a 8-9 inch square baking dish with cooking spray.
Bring water to a boil (in the microwave is the fastest...takes about 1-1/2 minutes). Add gelatin and stir until dissolved. Return to microwave for 1 minute (this just makes sure that the gelatin is completely dissolved)...stir well.
Add marshmallows and return to microwave for 45 seconds to 1 minute or until marshmallows are puffed and slightly melted. Whisk until marshmallows are completely dissolved. The cream layer will float to the top.
Pour into prepared pan. Refrigerate at least 45 minutes or until firm and well set. Loosen edges from pan. Roll up and slice (we found it helpful to secure it with toothpicks after we rolled it)!!!!
Serve immediately or chill until ready to serve!

Note:
-We tried it with Orange jello and it tasted like a dreamsicle!! So yummy! Can't wait to try some other flavors!!!