Wednesday, August 29, 2012

Monster Cookies:

These take a lot of ingredients, but they are so yummy and easy!!!! They freeze really well too, which is good, because this makes A LOT of cookies! Try a batch today!

Monster Chip Cookies Recipe

2 cups butter, softened
2 cups sugar
2 cups brown sugar
4 eggs
4 tsp. vanilla
3 cups flour
1 tblsp. xanthan gum
2 tsp. baking powder
1 tsp. baking soda
4 cups quick oats
4 cups rice crispy cereal
2 cups chocolate chips
2 cups coconut, optional
2 cups chopped nuts, optional

In a large mixing bowl, cream together butter and sugars. Add eggs, one at a time, beating well after each addition. Add vanilla. Add flour, xanthan gum, baking powder and baking soda; mix until well combined. Add oats, rice crispy cereal and chocolate chips and mix well. Mix in coconut and nuts if desired.
Using a cookie scoop, drop onto greased cookies sheets leaving about 2 inches between each cookie. Bake at 350 degrees for 10-13 minutes or until golden brown. Remove to wire rack to cool. Store in an airtight container.

Friday, August 24, 2012

Chocolate Chip Banana Oatmeal Cookies:

Funny as it may sound, these taste far more like Banana Chocolate Chip Muffins, than a cookie.
They have the texture of a cookie and look like a cookie, but taste like a muffin (I wonder if that means they are more like a breakfast item, than a snack? I'll be working on that one)! They're pretty awesome!
They were so fast and easy to whip up, too!
I hope you have some over ripe bananas on your counter right now, so you can try them!!!


1 & 1/2 cups Flour
1 tsp. xanthan gum
1 tsp. salt
1/2 tsp. baking soda
3/4 cup butter, softened but not melted
1/2 cup sugar
1/2 cup brown sugar
1 egg
1 & 1/2 tsp. vanilla extract
1/2 cup mashed ripe banana (about 1 large)
1 cup old-fashioned rolled oats
2 cups chocolate chips

In a small bowl, whisk together flour, xanthan gum, salt and soda; set aside. In a mixing bowl, cream together butter and sugars until light and fluffy. Add egg and vanilla and mix well. Add banana and mix well. Add flour mixture and mix until well combined. Stir in the oats and chocolate chips. Using a cookie baller, drop onto cookie sheets leaving about 2 inches between each ball. Bake at 375 degrees for 12-15 minutes or until golden brown. Place on wire rack to cool (or devour while hot.....the choice is completely yours). Store in an airtight container.

Note:
-The easiest, mess free way to mash a banana: Cut the banana into chunks and place in a zip-lock bag. Remove all the air and seal tightly. Now squish, squish, squish with your hands all over the bag until the banana is as mashed as you want. Then, snip off the corner of the bag with a pair of scissors and simply squeeze the banana into whatever you want. Throw the bag in the trash when you're finished!!!
-These cookies freeze very well.

Thursday, August 23, 2012

Potato & Green Bean Medley:

This was a fabulous side dish that my whole family enjoyed! It was pretty easy and tasted really good! It's nice for this time of year, too, if you have fresh green beans from your garden (which we did) and even potatoes (which we didn't)!! I hope you try it out!


4 strips of bacon, diced
3 cups potatoes, cubed (peeled or unpeeled)
1 & 1/2 cups fresh green beans, snapped into 1-inch pieces
1/2 small onion, finely chopped
3/4 cup water
1/8 tsp. black pepper

In a large skillet, cook bacon over medium heat until crisp. Remove to paper towels; drain, reserving 1 tablespoon drippings. Return the drippings to the skillet and add potatoes, green beans, onion, water and pepper. Bring to a boil; cover and cook for 15-20 minutes or until vegetables are fork tender, stirring occasionally. You'll want to watch and add more water as needed to make sure they don't burn or stick to the skillet. Let the water evaporate out once everything is cooked. Remove from the heat and sprinkle with the bacon. Serve!!

Tuesday, August 21, 2012

Hobo Packs:

I have tried a few different variations of the Hobo Pack, and whereas they were always good, they weren't GOOD. But I was getting hungry for them, and we had lots of peppers, onions and tomatoes in our garden, so I thought I would add some meat and seasonings to all that, and see what happened. I LOVED it!!!! Oh my!! It was so good!! I could have eaten one whole pack by myself! There wasn't one bit of it leftover and I will definitely be makng them again....soon! I hope you give them a try this summer!

1 (1-2 lb.) Round steak, cut into strips
1 large green pepper, cut into thin strips
1 large yellow onion, halved and sliced
1-2 cups cherry tomatoes, halved
4 tblsp. olive oil
1 package Dry Italian Dressing mix

Lay two, 16-inch pieces of foil out. Divide the meat between both pieces of foil, laying the strips in the center. Divide the vegetables between the two packs, starting with the onions, then peppers, then tomatoes.
Drizzle the oil evenly between both packs. Sprinkle both packs with the dressing mix.

 
Wrap tightly and fold the edges well so that the juices won't leak out while baking. Place both packs on a cookie sheet. Bake at 350 degrees for 1 hour or  until meat is done. Serve! (Take caution while opening the packs, as the steam will coming rolling out and is VERY hot!)

Note:
-This would make 4 generous helpings

Saturday, August 18, 2012

Check it out!!!!

I AM SO EXCITED!!!
After hours of work, I have finally finished putting together a recipe index for my blog!
It's a seperate page with it's own tab at the top of my blog. Check it out here!
Let me know if you like it, if I should change something, or any thoughts you might have about it!
I want it to be very user-friendly and am open for any and all suggestions for ways to make it better!!
I hope you enjoy it!

Yellow Rice:

---This is a very great and fast rice mix that we have really enjoyed and I wanted to share with you. It's found in the rice section of your grocery store (I know Walmart has it, I assume other grocery stores would too, but I can't say for sure). All you have to do is boil water, add oil and the rice and cook for 25 minutes. It has a great flavor! I hope you will give it a try.


Thursday, August 16, 2012

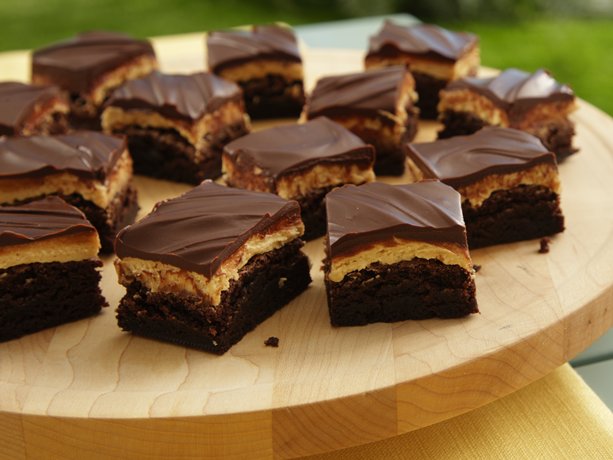
Peanut Butter Truffle Brownies:

I was desperately craving a brownie one day and happened across a blog, where that days post was all about 50 of the best brownie recipes!!! They ALL looked amazing, but whenever I see chocolate and peanut butter together, that's always my first choice!!! These were very good. Not too sweet (which I was kind of nervous about), and not an over powering peanut butter taste either. Perfect!! I will be making these again and I hope you at least give them a try
 (that way, when you make them more than once in the same month,
 I won't feel so bad!)!!!!!

Peanut Butter Truffle Brownies

1 batch brownies, prepared and completely cooled (click here for my easy recipe)

Filling:
1/3 cup butter, softened
1/3 cup peanut butter (creamy or chunky)
1-1/3 cup powdered sugar
1-1/2 tsp. milk

Topping:
3/4 cup chocolate chips
3 tblsp. butter

In medium bowl, beat filling ingredients until smooth and well mixed. Spread evenly over completely cooled brownies. Place chocolate chips and butter in a microwave safe dish. Microwave for 30 seconds. Stir. Heat for additional 10-15 seconds or until chips are melted, stirring often as chocolate burns easily. Allow to cool for 10 minutes. Spread or drizzle over peanut butter filling and chill for at least 30 minutes or until set. Serve!!

Slow-Cooker Vegetable Soup:

This was really easy and turned out really yummy!! It smelled so good while it was cooking all day too! It has to cook pretty much all day, though, so you'll want to definitely start it earlier in the morning. Hope you try it out!!

(Sorry no picture! I completely forgot and we ate it all! I'll try to remember next time!)

1 (1 lb.) round steak, cut into 1 inch cubes
1 (14.5 oz.) can diced tomatoes, undrained
3 cups water
2 medium potatoes, peeled and cut into 1 inch cubes
2 medium carrots, peeled and cut into 1 inch cubes
2 medium yellow onions, peeled and diced
2 celery ribs, diced
3 tblsp. beef bouillon granules (check the label for any gluten)
1/2 tsp. dried basil
1/2 tsp. dried oregano
1/4 tsp. salt
1/4 tsp. pepper
1-1/2 to 2 cups frozen mixed vegetables

Mix first 12 ingredients together in a crock-pot. Make sure the potatoes are all the way under the water, so they don't turn brown. Cover and cook on high for 6 hours. Stir in mixed vegetables. Cover and cook an additional 2 hours. Serve!!!

Note:
-I did not have any canned, diced tomatoes, but I did have an over abundance of cherry tomatoes from our garden! I just quartered enough to equal about 1-1/2 cups, covered them with water and added them to the soup! It turned out just fine, so use whatever you have.

Wednesday, August 15, 2012

Cucumber Salad:

I love this stuff and it's a fabulous side dish during the summer...
especially when you are over flowing in cucumbers like we are!!!


6 cups cucumbers, peeled or unpeeled, and sliced however you like
1 small onion, chopped or sliced
1/2 cup mayonnaise
1/4 cup sugar
dash of salt and pepper

Toss together cucumbers and onions in a large bowl. In a small bowl, combine mayonnaise, sugar, salt and pepper. Pour over cucumbers and stir until well coated. Serve!

Note:
-Some of the cucumbers we had, had a LOT of seeds in them, so I actually scooped them out before I cut them up. It helps to not make the salad watery.
-This is not something you really want to do ahead. You could have everything cut up and in a bowl, but for best results, wait until the last minute to add the dressing.

Tuesday, August 14, 2012

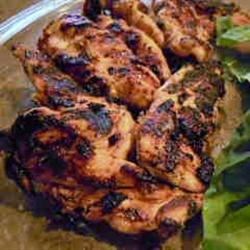
Marinated Ranch Chicken:

This was so easy and very yummy!!
Throw it in the fridge in the morning and on the grill in the evening!!
My whole family enjoyed it!!


4 chicken breasts, thawed
2 pkg. dry ranch dressing mix
4 Tblsp. olive oil
2 Tblsp. vinegar

Place chicken in a gallon zip-lock bag. In a small bowl, whisk together remaining ingredients. Pour over chicken. Seal bag and toss to coat the chicken (I like the squeeze the chicken and kind of massage the dressing all over it). Refrigerate for at least 1 hour, but the longer the better. Grill until done! Serve!!!

Note:
-I cut my chicken in 2-1/2 inch strips lengthwise and pierce them all over with the tip of a sharp knife, so that the marinade can get all the way into the chicken and it makes it taste so yummy!!!
 

Monday, August 13, 2012

Pumpkin Zucchini Bread:

NOW WAIT A MINUTE!!!
Before you totally skip this post because you think it sounds weird, let me tell ya! It's actually really good!!! When I first saw the recipe for this, I couldn't decide if it would be a good thing to try or a really bad thing! But the more I looked at it and read over the recipe, I decided with all the zucchini we have around here, I'd chance it!! I'm SO glad I did! I made it into muffins instead of a loaf, and they came out so moist and wonderful! It tastes 0% like zucchini and to be perfectly honest, it doesn't have a very strong pumpkin taste either! But yet they're so good! So, I hope you'll at least give them a try!


2 eggs
1/2 cup white sugar
1/2 cup brown sugar
1/2 cup canola oil
1/2 cup canned pumpkin
1-1/2 t. vanilla
1-1/2 cups flour
1 t. xanthan gum
1/2 t. baking soda
1/4 t. baking powder
1/4 t. salt
1/2 t. cinnamon
1/2 t. nutmeg
1/4 t. ground cloves
1 cup shredded or grated zucchini
1/2 cup chopped walnuts, if desired

In a large bowl, whisk together eggs, sugars, oil, pumpkin and vanilla. In a small bowl, whisked together flour, xanthan gum, soda, baking powder, salt, cinnamon, nutmeg and ground cloves. Stir the dry ingredients into the wet ingredients until well combined. Stir in zucchini and nuts. Pour into a greased loaf pan, or fill paper-lined muffin tins 3/4 full. Bake at 350 degrees for 45-55 minutes for the loaf or 30-35 minutes for muffins or until toothpick inserted in the center comes out clean. Cool in pan for 10 minutes. Serve warm or place on wire rack to cool! Store in airtight container. 

Note:
-I like my muffins to be a little crunchy on the outside, so I left them in a for a little while longer than what the recipe suggests.   

Sunday, August 12, 2012

Squash Casserole:

We always have an over abundance of yellow squash in our garden every summer. I had heard of squash casserole, and it sounded good, so I searched until I found a recipe that looked easy and yummy.
It turned out really good and I've made it a few times now.
I hope you give it a try!


6 cups cubed yellow summer squash
1 large onion, chopped
dash of salt and pepper
1 cup mayonnaise or miracle whip
1 cup shredded cheddar cheese
1 cup crushed cornflakes
Additional shredded cheddar cheese and crushed cornflakes

In a large skillet, saute onions until tender (stirring constantly so they don't burn). Add squash and cook until tender and until all the water is evaporated (while the squash cooks down, it will release water). Remove from heat, and stir in mayo, cheese and cornflakes. Spread evenly in a greased casserole dish. Top with extra cheese and then cover with additional cornflake crumbs. Bake at 350 degrees for 25 minutes or until heated through. Serve!

Note:
-This makes a pretty large casserole, so if you're feeding less than 6-7 people, you will want to cut this recipe in half.

Saturday, August 11, 2012

Pasta:


Since I just posted the recipe for Chicken Noodle Casserole a few days ago, I thought I would do  a post on the pasta that me and my family LOVE!!! We have tried a few different gluten-free pastas, and if you have one you love, then by all means use it! But we weren't totally satisfied with any we had tried. Until, my Aunt introduced us to this pasta! It's a corn and rice blend pasta and tastes as close to wheat-based pasta as anything I've tried. You don't have to cook it forever, or rinse it off for a full 10 minutes after it's cooked, only to have it turn to mush as soon as you do anything with it. I know that it's sold at Walmart, Martin's, Bi-Lo and I'm sure other grocery stores as well. If you're grocery store does not sell it, consider taking them a photo and information about it, and asking them to stock it. Some places won't, but some will, so I think it's worth a try!

This brand comes in three varieties: Fusilli (a spiral), Penne (a small tube), and spaghetti.
I've tried all three and equal like them all!


<*><*><*><*><*><*><*><*><*>

As for Lasagna noodles, this is the only one I've tried because I was very happy with it the first time I tried it and therefore I haven't risked the money in trying something else!! We purchase it at a local health food store, so I'm sure it's sold at other stores as well, I just don't know which ones. The Tinkyada company also has many other varieties of pasta that are very good as well. I have tried a few of them, and really liked them, but they are pretty expensive.  


Check out their website here to view all of their products.
You can also purchase Tinkyada Pasta Joy Products at Amazon.com

Thursday, August 9, 2012

Homemade Cream of___Soup Mix:

I don't know about you, but I think almost everything we used to make, had a can of cream of ___ soup in it!! It's definitely been an adjustment having to leave behind all the recipes we used to have on a regular basis and turn down amazing looking recipes we find now, just because of one simple ingredient.

Well, thankfully, that's about to change! I just found an easy, delicious, homemade substitute for a can of cream of ___ soup!!! I definitely hope you will take 5 minutes and try this out, because I can think for 5 hours about all the recipe options this will open up for us!! I hope you enjoy it! Let me know what you think!

Homemade Cream-Style Soup Mix Recipe

2 cups dry milk powder
3/4 cup cornstarch
1/4 cup chicken bouillon granules (make sure to check the label!)
1 teaspoon onion powder
1/2 teaspoon dried thyme
1/2 teaspoon dried basil
1/4 teaspoon pepper

Whisk altogether until well combined and free of lumps. Store in an airtight container.

To make the equivalent to a (10-3/4 oz.) can condensed cream of ___ soup:
Whisk together 1/3 cup soup mix with 1-1/4 cups water in a small saucepan over medium heat. Bring to a boil (stirring constantly) and boil 2 minutes or until thickened. Cool.

Note:
-This alone is a perfect substitute when a recipe calls for a can of cream of chicken, cream of mushroom or cream of celery soup. If you like, add some very finely chopped mushrooms to make it more like cream of mushroom soup, and some finely chopped, cooked celery to make it more like cream of celery soup!

Saturday, August 4, 2012

Cheesy Garlic Bread sticks:

Who doesn't LOVE bread sticks? I know that they are definitely a personal favorite of mine, and I've never met anyone who didn't like them. It's one thing I have missed since going gluten-free...not being able to go to a pizza place and eat the pizza, of course, but more the bread sticks! Well, that is, until today when I tried this recipe. WOW! They were SO good and incredibly easy!!! If you're a bread stick, pizza or cheese lover, you going to LOVE these things!! I hope you give them a try!!!


1 pre-baked pizza crust (click here for my recipe)
2 tblsp. melted butter
2 tsp. minced garlic
1/4 cup grated Parmesan cheese
Mozzarella cheese (amounts vary)

In a small bowl, stir together the melted butter and minced garlic. Using a pastry brush, spread the butter and garlic all over the pizza crust (make sure to spread it really well, because you don't want globs of garlic to bite into!). Sprinkle the Parmesan cheese evenly over the entire thing. Top with mozzarella cheese. This is were you will have to use your own judgement. Use as much or as little cheese as you like! Bake at 450 degrees for about 10 minutes or until cheese is bubbly and starting to get slightly golden brown on top (you can tell from the picture above, that I didn't leave mine in the oven quite long enough. It's not quite as golden as I would have liked it). Let stand 1-2 minutes before cutting. Cut into 1 or 1-1/2 inch slices all the way across the pizza, then cut in half lengthwise. Serve!!!

Friday, August 3, 2012

Chip Casserole:

Hello! Sorry it's been a while since I lasted posted a recipe! It's been ridiculously crazy around here. Between a week of church camp, a funeral, a big family picnic and two family reunions (all of this happening in the same week, I might add!), I just haven't had time. Plus, to be perfectly honest, I haven't even been cooking!!! We made so much food for all we had going on, that we've been eating leftovers all week!


My mom used to make a version of this casserole when I was younger. It was SO good and we all loved it. But it had SO many ingredients and so much stuff to cut up and everything, that it seriously took all day to make. Therefore, we had it very rarely. I came across this recipe one time and decided to give it a try. It was SO fast and easy and we actually liked it better than the one we used to make! So, I hope you give it a try and enjoy it as much as we do!

4 cups cooked chicken or turkey, cubed
Dash of salt and pepper
2 celery ribs, chopped finely
1/4 cup onion, chopped finely
2 cups Velveeta cheese, cubed
2/3 cup mayonnaise (I use miracle whip)
BBQ Potato Chips (check the label!)

Oven Method:
Combine chicken, salt, pepper, celery, onion and cheese in a large bowl and mix until well combined. Add mayo and stir until everything is evenly coated. Spread evenly in a greased casserole dish. Cover with foil, and bake at 450 degrees for 20 minutes or until hot through and cheese is melted. Remove foil and bake an additional 10 minutes. Lightly crush potato chips and sprinkle over the casserole (we like a lot of chips on ours). Serve!

Crock-pot Method:
Combine chicken, salt, pepper, celery, onion and cheese in a large bowl and mix until well combined. Add mayo and stir until everything is evenly coated. Pour into a crock-pot. Cover and cook on low for 3-4 hours or until hot through and cheese is melted, stirring occasionally. Sprinkle with lightly crushed potato chips and serve!

Note:
-For the crock-pot, I highly recommend using a crock-pot liner. It helps it not to burn to the sides of the crock-pot and makes clean-up so much easier!